This is a tutorial where I show how I make a 1:9 (traditional) scale rider doll. It's an animal, so be aware that the dolls seen here do have tails. These are designed to ride a model horse as accurately as possible. I try to keep this simple, and tell only what I need to... But I bet I tell more than I should, or that my way to write makes some steps seem harder than they really are!
 |
| The rat in the left is one of my best riders, though shows the older style that I don't use anymore, but he has some personality. That cat on the right has really excellent balance. I mean, he can stay on just with his legs, which is a thing I couldn't first expect from a doll. |
Why? I personally don't miss the years when I had no dolls for my horses. They make things so much better. Also, to be honest, my dolls - since I haven't seen anyone else doing animal dolls for model horse riders - are different than everyone else's, so I can call them unique. Overall, rider dolls put a lot extra into model horse hobby, no matter was it happening at home or in a liveshow. They're worth owning. By making my dolls fully myself, I'm not dependent from other hobbyists (there are talented dollmakers, I say) or money that much, and I can do a new doll whenever I feel right to. It doesn't even take more than couple of days to finish, which is nice for a person who lacks patience and wants to get projects done quite quickly.
MATERIALS
- thick metal wire (0.9 mm)
- thinner metal wire (flower wire or whatever that is, maybe 0.4 mm)
- silk clay
- foam clay (optional)
- about 3 mm round beads, plastic or wooden
- thin and soft leather
- fabric
- pipecleaners
- glue (I recommend Pattex contact glue, but anything works which lets you work in no hurry)
- acrylic paints
- matta and glossy varnish
- viscose hair/opened yarn (optional)
TOOLS
- various pliers
- sculpting tools (includes needles, toothpicks and bamboo skewers)
- a cup of water
- a board for sculpting (may be wood, rubber or plastic)
- paintbrushes
- a cutting mat
- scissors
- a craft knife
Safety
Use work gloves to protect hands and safety goggles to protect your eyes, when you craft with metal wire. For first they will seem overrated, but after you peel skin off from your hand or stick a wire into your eye, you will happily wear them.
About the clays
Silk clay and foam clay are not similar to any other clay. Both are airdrying, soft to handle, lightweight and a bit rubbery-like. Both are sold in many different colors and can be mixed to get more colors and tints, and silkie and foamy also mix together. Especially silk clay can be used for very detailed or simplified work, depending from what technique you use. I can't say it's great for super fine animal sculptures, but it works for these funny dolls I do, and I can do them realistic enough for my taste (at least from faces, which is super important). You can do super smooth and thin things from this, and from foamy, too, but in that the "beads" play a role.
 |
| Silk clay. |
 |
| Foam clay. It feels better than it looks. |
Do NOT put these to the oven - they are not polymer clay! They dry by room air. The drying time depends from how thick the piece is, and I can say the drying takes a bit longer than people usually think - could say, like, at least one complete day for a thicker piece. The clay is NOT completely dry if it's yet a bit flexible - it shouldn't be! So, let it dry. With dolls this is especially important to know. The clay will break easily if you bend the joints before it's really hardened. However, it's not going to get rock hard, but not staying "slightly flexible" neither.
Silk clay is not waterproof. Foamy is not neither, I guess. You can test this by putting a dry piece of clay in a bowl of water and leave it there overnight. See what it looks at the next day!
Both silk clay and foam clay can be painted and varnished on.
Notices
- Read the whole tutorial before you use it.
- This tutorial is about
realistic animal dolls. I do not stylize these, so I don't give tips for caricature ideas.
- Use water when you sculpt. I will not repeat that word all the time. (Don't moisturize the clay too much.)
- Feel free to test out your own ideas. You will like something that doesn't work for me. I tell my technique, not others'.
- I still wish you could try to follow this tutorial as it is, when you do your first doll. I recommend my tutorial because it works for me. I want to see if it works for you too.
- I do mostly rats, mice and cats, so I write this with those in mind. Feel free to suit it for what other species you want to do, but keep also in mind that I haven't maybe done that, so I may not have idea how to do that myself. I'm learning as well.
- If you have a Breyer doll (or something similar) handy, use it to check measurements. I use a ruler and a calculator to check how tall that 1:9 scale thing could be in full scale (1:1), and have found out that my CM Breyed dolls (two men) could be slightly over 170 cm. I do the counting by doll length in cm x 9 = full scale length.
-----------------------------------------
THE WIRE ARMATURE
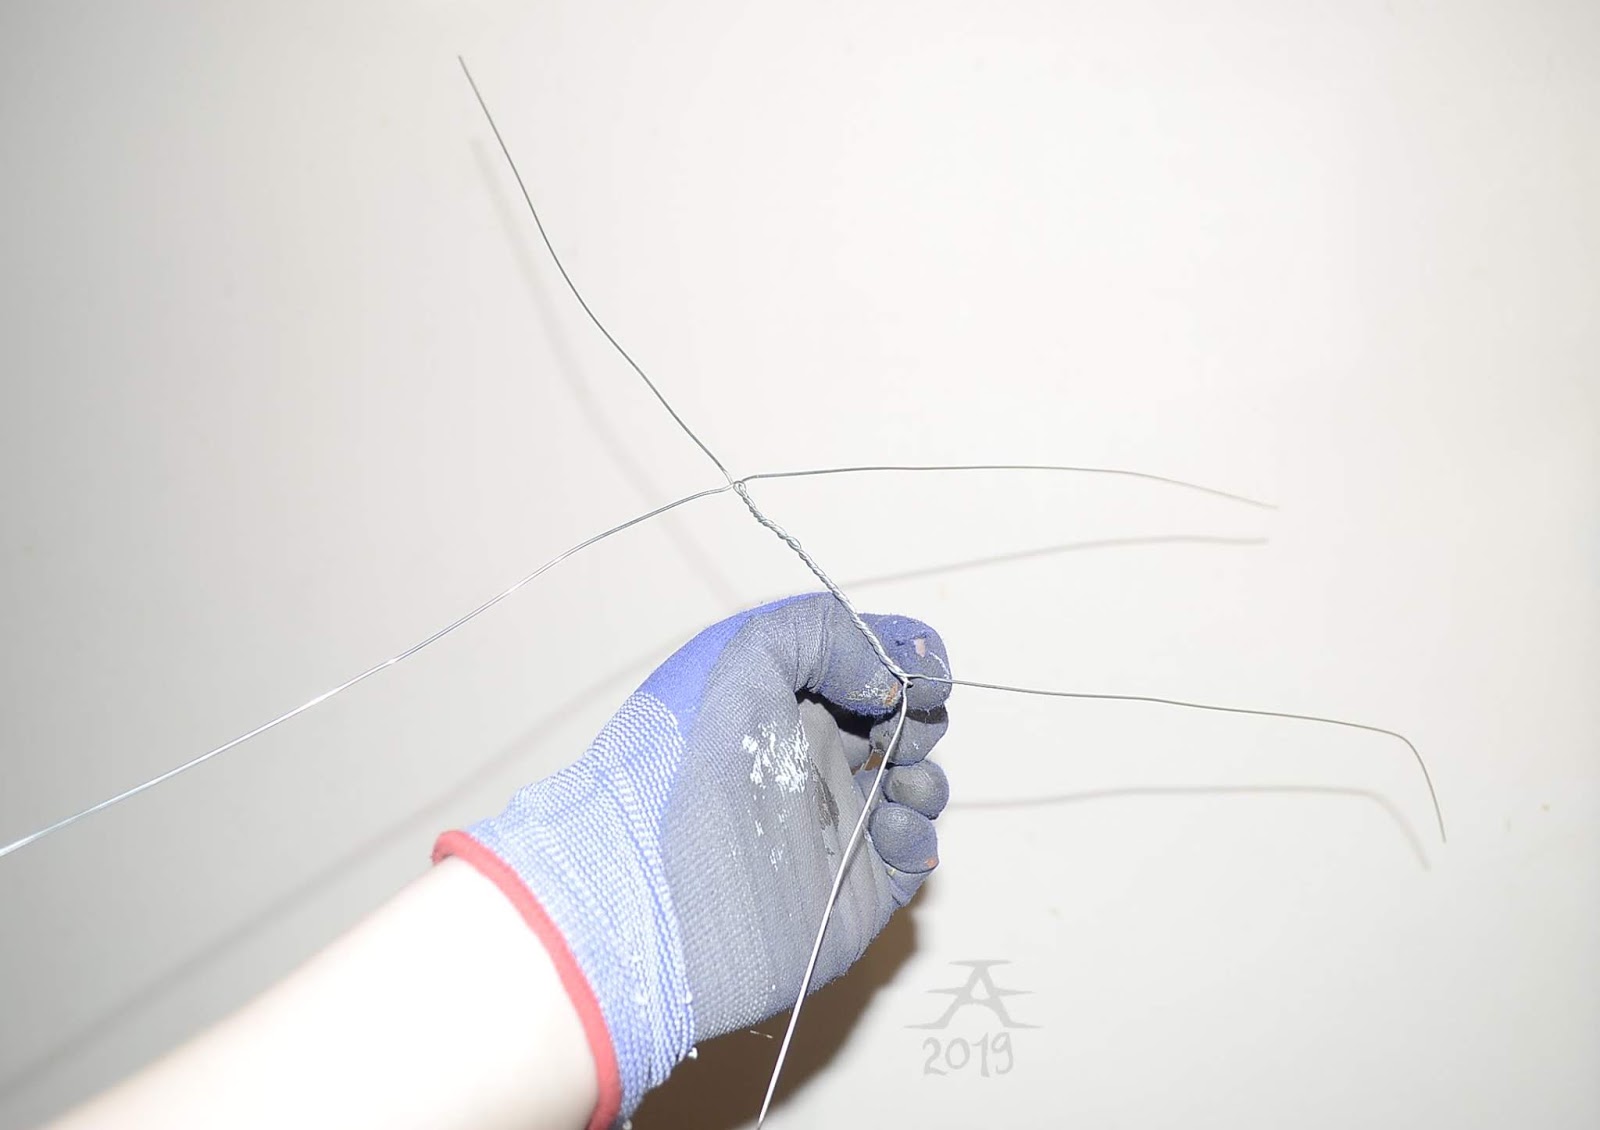
A doll needs a wire armature to be sculpted on, so get a roll of thicker wire (0.9) and one of thinner (maybe 0.4). Cut three about 40-50 cm long pieces from the thicker wire and twist them together with holding them with pliers and twisting with your other hand. Twist for about 5-7 cm length. Use work gloves and goggles during this (and whole wire step).
 |
| I made this recipe for myself only, but it can tell a bit about the process. |
Then separate the three wires from each end. Check which of them are symmetric to each other and choose them to be arms. The third will be neck.
Do the same for the other end, having the third wire for tail. You can tie it a bit around the "legs" and secure between them to make sure they are, well, secured and clearly recognizable.
 |
| Here I'm holding from the tail. |
Make the head by rolling the neck wire with round pliers. Make sure the neck doesn't become too short and head too long, because clay takes space. I like to have the neck to be roughly same length as the head.
 |
| Looooooooong arms. |
Do some shoulder loops: put your fingers to the armature's armpits (see the step 6. from the armature recipe) and bend each (closer) arm down. Take round pliers and make a loop, don't put the arms down this time. Check symmetry with a cutting mat. Do not cut the actual arms yet!
Measure the length of torso + head and neck. Put the leg wires to a split position. Measure the previously mentioned length for each leg, put 2 cm extra and mark it. Put yet 2 cm, mark, and 2 cm, mark.
 |
| See the three red dots? There's 2 cm in between each of them. The dots are at 7, 9 and 11. (And that's not accurate to how long the legs truly became - I just placed the leg randomly there so the dots get placed like they should, with 2 cm distances.) |
 |
| More accurate - 9, 11 and 13. |
 |
| This is my marker marker. |
Take round pliers and place the last 2 cm marking to it, then bend the excess wire outwards. Cut the excess wire off from the middle mark's side. Bend the feet to standing position by the ankle.
 |
| That "X" is the excess wires. They go inwards at the middle dot's place and have to be cut from next to them. |
 |
| Feet cut. |
Now measure the distance between a shoulder loop and the crotch. Add 1 cm more. Measure this to each arm wire (which is usually 8-9 cm), and mark it. Cut.
 |
| 10 cm is too long. Put 9 instead. I'm good with doing my tutorials correct, am I? |
Bend the tail wire roughly to a S shape, and cut it a bit below the toes.
Second we add thin wire (maybe 0.4 mm). It's necessary because it gives the clay some surface to stick into, and makes the armature a bit easier to hold, as well as makes it a bit more firm. Cut few at least metre long pieces from thin wire. Start twisting it around the torso, secure with going around the neck and then back to torso. Twist around the neck, then "tie" the (thick) head wires securely together, go back to the neck and torso. Twist around each upper limb, go through the shoulder loops. Mark 2 cm from the end of an arm and don't go over that with wire, just go back and to the torso (that word gets overused here). The first wire usually ends here.
 |
| Start the wiring from torso and head. |
 |
| Eventually we are in the legs and tail root. |
Take a new wire and start it from the torso, go down, twist a bit around the tail root and leg roots. Twist one leg to the ankle, come back, twist the tail for 2-4 cm, come back, twist the other leg to the ankle, come back. Twist a bit in the torso, then go a bit lower at it and put the wire through a shoulder loop. Twist few times at the torso, repeat to the other loop. Twist in the torso. Secure the wire.
 |
| In the left is Omar's armature, 2019. The one in the right is Koi, an old armature that never got sculpted on since it has aged already, and I need to do some practice before I can sculpt his face... Have no idea when that happens. He's going to get a new, fitting armature too. |
 |
| I like to make these things in batches. |
Bend the leg wires so that there's some curve at their roots. Check for overall symmetry, make the armature to stand and check the balance. Fix the symmetry and balance as long as you're okay with it. Now we're ready for clay.
SCULPTING
Take some
silk clay and
foam clay (which is optional and used for curly coated animals). Keep a water bowl and tool cup handy as well. Have a separate board for sculpting, because this can get a bit messy.
 |
| Clays and eyes of one. |
 |
| Water cup, a tool, and another tool. |
Take quite a large piece of clay, roll it round and splat to the armature's chest side. Try to get it even and hiding all the wire from the area it is on, including shoulder loops. Keep the waist exposed, so no clay too low on the body. Check for symmetry. Add a half-finger sized clay bar to the doll's chest to make chest muscles or tits. Use a tool to make a vertical line to split it in half, blend and shape with fingers and tools. You can also add one wide extra piece of clay under that if you feel your doll is looking too skinny and needs a tummy.
(Due to reasons I don't have much photos of the sculpting step...)
Take a clay ball, should be nearly 3 cm in width. Flatten it a bit and splat to the doll's head from above or front. Make it a ball, then when that's okay, start shaping it to an oval. Add more clay to the top of head - and cheeks - if you want (you will need this for cats and other animals who have a slope in front of their forehead). Blend with tools and water.
Now let's do a
face. For mouth, do a vertical line from the muzzle, deepen to the down. Dip the tool in water, put back to the doll's mouth and press carefully outwards while the tip stays still, to make lips and mouth corners. You can use various tools to deepen the mouth inside, what you feel nicest to use.
 |
| This is a mouse, but the technique is similar as with rats... (He became accidentally muscular. Irony; the house mouse, which is what pet mice are bred from, has a latin name Mus musculus, which means "muscular mouse".) |
Next we do
eyes. Take a sharp tool, stab some eye socket marks where you need them. (For a rat it's about midway of it's head length). Make sure you don't put the eyes on forehead, since no animal has them there. If the placement is okay, deepen the sockets first with a pointy tool and then with a tool that has a round tip.
 |
| Eye sockets marked. |
 |
| The sockets are about in the midway of the head's length. They also become widened and deepened with a ball-tip tool. |
Take two beads (plastic or wooden) of 3 mm width and put them to the sockets, press and carefully "scrape" some surrounding clay on them. If you want to do an angry expression, you should have a bit extra clay on the doll's forehead (top of the head) to be able to scrape more clay over the eyes without exposing the inner wire.
 |
| Eyes on place. There's already some clay acting as eyelids. |
 |
| I very very very rarely get my dolls' faces actually symmetric, but it has been also worse than this... |
Cats have a recognizable expression, which is harder to make compared to rodents. Their eyes need to be deeper in the head, which means that you have to use more clay for a cat's eyelids.
 |
| Before extra clay, the cat looks a bit like a hamster. |
 |
| After the extra clay the eyes aren't too widely open ans also may have some angle; in the end this worked better than it looks in this step (this is the same cat as seen in the opening photo of the whole tutorial). |
For
rat nose, take a small piece of clay and make it an oval, flatten, and splat on it's place horizontally. Use a narrow pointed tool (like a needle) to press nostrils to the oval's ends, and then do a vertical line over the nose and to the inside of mouth.
To a
cat, take a small round piece of clay, flatten it a bit, splat to place. Use a tool to make it triangular in shape, with one corner pointing down towards the mouth. Blend the edges to the surrounding clay. Take a narrow tool (that needle) and do nostrils, then the vertical line on nose and down to the mouth.
Next we do
ears. Take two pieces of clay that are similar in size, make them round and then oval. Flatten from one end and keep the other thick. Use a needle to mark placings for the ears on the doll's head. Put the ear roots in place, blend with various tools and water. You can affect the doll's future expression by attaching the ears in different positions. With a cat doll the technique is quite same, except that you have to keep the ears pointy and roots wide. (Ears, at least when it's about rats, don't have to be exactly symmetric - sometimes their shape varies alot in one and same animal!)
Second we do the
thighs and butt. I have various wayt to do this, and I still try to figure out how to make it best, but usually I just have two large clay bars that I flatten and put on place from the doll's backside. So the seams are in front then. Add more clay to the buttocks if needed. Check symmetry.
For
upper arms, take a piece of clay, shape it to an oval and check if it looks okay in length and thickness (shouldn't be too long) to it's place. Now do a pair for it, anf flatten both a bit. Splat the piece to it's place from above, so the seam side is next to the doll's armpit. Repeat to the other arm. Check their symmetry.
Now
let the clays dry. Place the doll securely somewhere so it can't jump off to the floor and harm itself (they're good at that). Go to do something else, like sleep, eat, walk, etc.
 |
| Asko (2019) drying safely. |
Then when the clays are dry enough, we continue to sculpt, now for the forearms, calves and pelvis. the
forearm and
calf shape similarly as upper arms, only amounts vary and we should check that the wrist and ankle areas don't get too thick layer of clay.
For
pelvis, take quite a large piece of clay, about same size as the head. Roll it round, flatten a bit, and splat to it's place from the frontside. Shape it from the backside, where the seam shall be, and make sure it doesn't fall open. Use your fingers and tools to make moving space for the thighs, and by that you automatically do some crotch shape too. Keep it or blend it off, how you like, I personally want my dolls to have some basic anatomy shape since they usually aren't genderless.
Now leave your doll to dry for some hours.
Additional clay tips:
- If you want your doll to have a mane, you need a craft knife to make a slot on it's head. This has to be done after the head had hardened a bit, but isn't yet complete, so it's not too rubbery but also not too hard to work under knife. Use the knife a bit like a saw. Be careful. The slot shouldn't become too deep and no wire should get visible.
- For cat dolls and other furry-paws, leave a bit of the thin wire uncovered in wrists and ankles to have something for the paw materials to stick at.
 |
| A mane slot. It's Kippura (December 2016). |
SOFT PARTS (LEATHER, FABRIC, PIPECLEANERS)
All leather, fabric and pipecleaners are optional, though you will always need one of them depending from what animal you are doing. I use leather for rats and mice. Fabric and pipecleaners work for animals with furry paws and tails, like cats and dogs; currently I myself use only pipecleaners. This step requires the use of a rubber cutting mat (with grid pattern) and glue. My glue is Pattex contact glue, and it's not the instant-splat type, and this will show in here. Another reason why I use it is that it does not smell!
To do paws and tail for a rat or a mouse, you need a large piece of
leather that is soft, thin and flexible. Cut it into long strips that are about 3 cm wide. Now cut that into two 2cm x 3cm and two 3cm x 3cm pieces. Then cut one long piece for the tail, it's 12-15 cm depending from how long tail wire your doll has (it can also be shortened afterwards). Decide which end is the root end (usually wider) and cut it's corners. All these pieces are meant to have some extra, and you will see why.
 |
| Example pieces that I use to remind myself of the pieces' size if I forget it... The tail will often be clearly longer than that. |
If needed, write to the pieces (with a marker or a ballpoint pen) what they are for and for who (useful when doing many dolls at once). You can also draw a line in the middle of the tail piece to guide you when it gets glued.
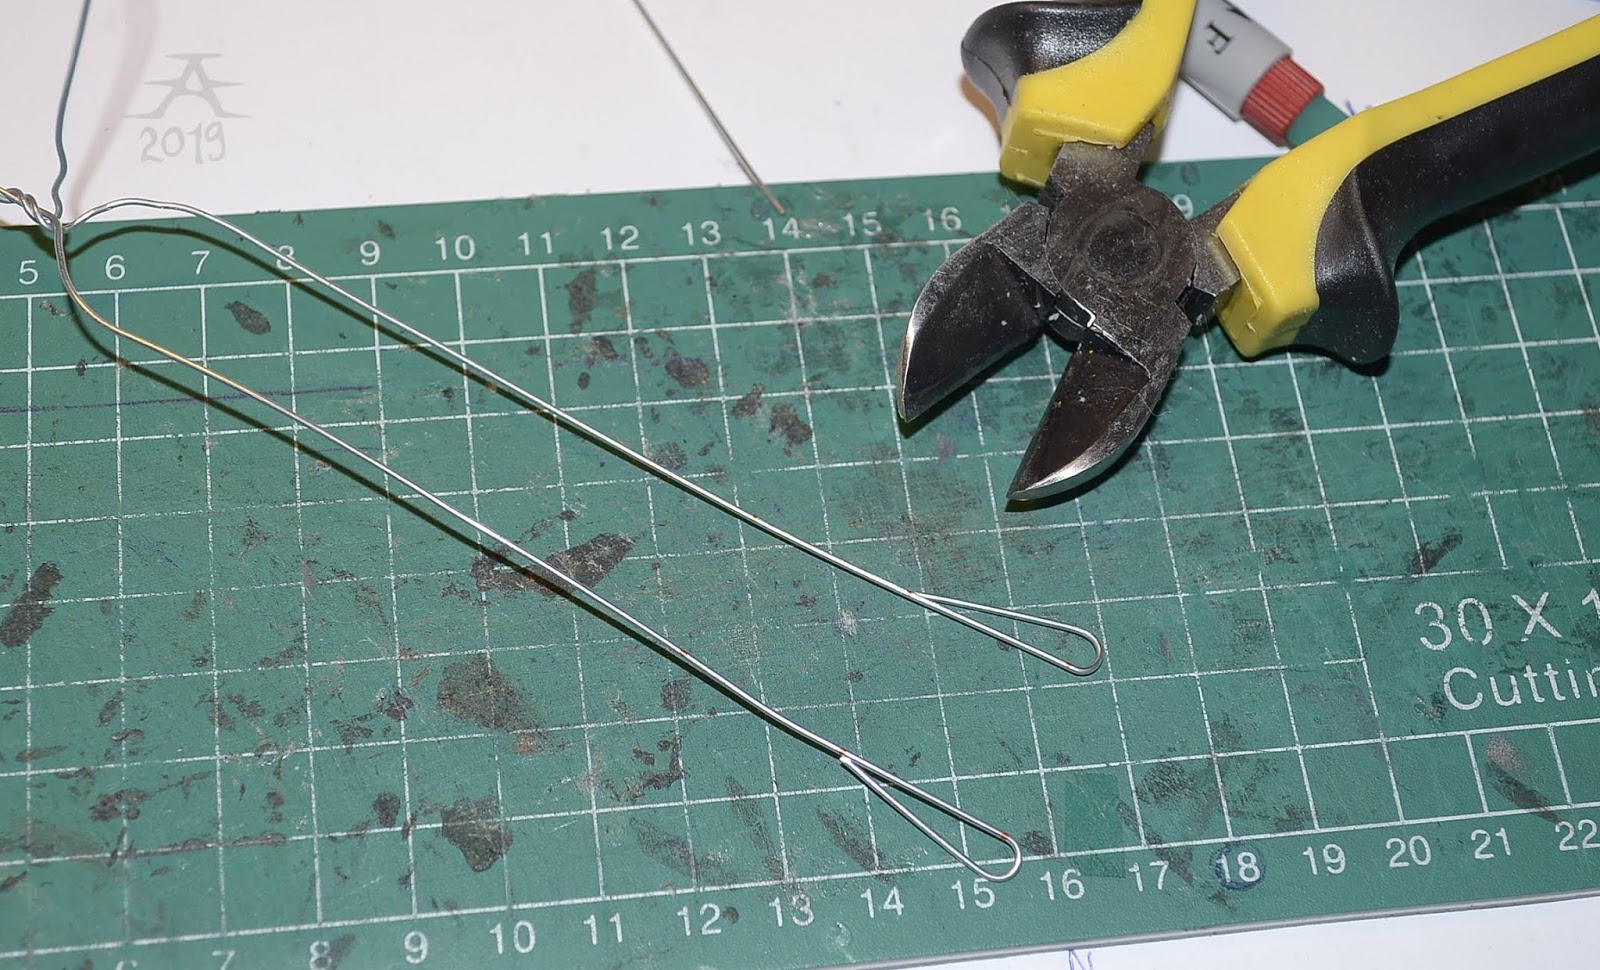
Put the pieces to the cutting mat, undersides up. Blurt some glue to a glue package piece etc. what you have in handy (most important thing is that you can move the thing the glue is on). Then get some tool what you like to apply glue with, I use a homemade wire tool (here's how to make it). Take your doll and bend it's toes and tail straight (and arms and legs to somewhat starfish-like position). This is stressful for the doll so you can let it lie on it's belly on some surface, just make sure the nose is not against anything at that time. You can also put it stand on the table, if it's safe there.
Now we will apply the glue to the leathers. Use a tool, and take enough glue at a time that you can just "brush" it widely. Hold the leather piece from one corner, where you aren't going to put glue - that is why there's some extra! Let the glues be about 15 minutes, until the glue has turned from white to transparent. That means it's ready for use. The pieces will go twofolded.
 |
| Pattex contact glue after applying and left to set for a moment before attaching them to the doll. |
Attaching the leathers will be a bit tricky, and you need to be careful. I recommend putting the foot leathers first, since the feet need some support and I don't think it's okay for the doll to just lie around too long. These are the 3cm x 3cm pieces. Place the foot's inner side in the middle of the leather, and fold outwards. The leather should cover all the wire of the foot and ankle, and end to the clay. Hold few seconds. Repeat to the other foot, as mirrored.
 |
| Jyri's feet before trimming. |
Second, take the 2cm x 3cm pieces for hands. (Your doll's arms should point to the sides now because of this.) Hold them so that the shorter side points to the torso's direction. Fold from frontside. Make sure the leather covers the wire and a bit of the clay, so it sticks well. Hold few seconds again. Repeat to the other hand.
 |
| This is how the hand leathers should be positioned - in the "flying" angle! |
Now we have to attach the tail. Bend the tail wire as straight as possible from the root. Take the tail leather and gently hold it from near the root end (where the corners were cut). Hold the doll upside down (head to the floor) to place the tail in the middle line (that what you drew), and push the leather's halves together. Hold few seconds. Repeat holding the wire in the midway, press the leathers together, hold. Until the tip. There will be a bit extra, so you can cover the whole tail wire with leather.(Make sure the tail tip has not too much leather, it will fool eye and finger later...)
Now get some scissors to trim the paws first. Round them, but make sure not to cut too much, so cut small amounts at once. While the feet may take a drop-like shape, the hands shall remind of mittens. Before you go to the tail, bend the feet to stand-position from near the ankle, so the doll is ready to stand after you've trimmed the tail. To trim the tail, bend it very upwards from the root, bend the legs forward and/or to the sides and trim the root, maybe cut some notches there (near the tail root) to make it easier to bend later. Then go to the tip (hold it) and cut very close to the wire, and as you go closer to the root, make the distance a bit longer so the tail will soon have a narrow tip and be thickest from the root. Your doll will now be ready for paint!
 |
| One angry dude right after his paws and tail got trimmed. Had to capture that funny position, which is also accurate to how the doll was bent when I trimmed his tail. |
You can use
fabric in the place and similarly to leather, if you do a cat, dog, etc. with furry limbs and tail. I myself have done this only once - when I did my first ever homemade doll, who is a cat - and have used the same technique for forearms and calves of my rat dolls before I started to sculpt those parts too. With some dolls I also rolled the fabric around the limbs to avoid the flattiness folding can cause, but even this had it's problems... My biggest problem with fabric is that it allows the glue to go through it, which isn't nice, and it gets forever to dry, and yet is difficult to handle and cut. And worst of all, fabric is prone to fraying, which will mean that my dolls are getting flayed by time. So I am happy to not use fabrics for my doll stuff anymore. But you can if you get along with it.
 |
| Juoru (my very first fully homemade doll) has limbs and tail made of fabric.Thanks to careless gluing I can now show how his arms were glued. The tail was "rolled", which I don't like as a technique, so that's why I waited couple of years before I did cats again. (But he's also my only doll with painted pawpads!) |
 |
| Rolled fabric for arm. This technique is no longer in use because I do those parts from clay these days. |
It took me couple of years to figure out the better solution to avoid fabrics but be still able to make cat dolls:
pipecleaners. I first doubted their usefulness, but after trying twice, I can say thet were a good idea. The cats get fluffy paws and tails and no wire gets seen. However, the thinner pipecleaners are weaker, and can't support the doll's weight that well when used for tail. Still, when using stronger (and in my dolls' case; fluffier) pipecleaners, these do so much good that I am not disappointed by a random slightly weaker tail. The doll can still ride and walk, just doesn't keep their balance as securely as the rats do. Another reason to buy these is that they may have stripes! Cats can have stripes, so, yay!
How do we add pipecleaners to the doll? Start with the feet. Take one full length pipecleaner, and roll it around the doll's ankle a couple of times. Then roll to the foot itself and around it. Make sure the twisting is durable and not loose. It may take some armpower and nerves. Do close-set rolling, that way the result will be fluffy, secure and no wire gets exposed. End the cleaner to the ankle. Cut excess wire off. Bend the feet to standing position similarly as when they're leathered. What may be a bit weird is that each paw really will take one (almost) full pipecleaner!
 |
| It takes a full pipecleaner! |
For hands, start from the wrist by securing the cleaner's wire under the thin armature wire. Then roll few times around the "hand", go back, and secure to the wrist again. It really doesn't look like a paw, but well, it looks better than the fully visible armature wire, heh?
The tail is just... twisting. So much twisting that the base wire doesn't show. When the pipecleaner is securely attached to the tail's base wire, I cut the base wire's rest off and allow the pipecleaner act as that. I try to make it in a way that the cut wire end doesn't show, but I am yet figuring out how to do this step nicely.
 |
| A tail of a cat. |
(The following can be done also after completely finishing the doll.) When the paws, be the material whatever possible, are done, it's time to bend the hands to the useable position. Take round pliers, place them roughly 1/3 way from the paw's tip and carefully bend inwards (not sure you got the idea?). Now (I assume the arms are straight to the sides) bend the arms down to the doll's sides by holding from the upper arm part. Secondly bend the forearms forward, so they go to roughly 90 degrees corner. Now they are in a riding position. (You need to fine-tune the position every time you put a doll on saddle, but yes.)
PAINTING
Otherwise than eyes, painting is mostly optional, since silk clay and foam clay have already colors in themselves. I use acrylics (who dry waterproof) for this. Usually I add some color to the doll's mouth or shade it's body (usually on light colored clay), if not anywhere else. After the paints have dried, I varnish them with Vallejo matta.
Take your sculpting board and cover it with household paper. Put one paper to the side of the board and a cup of water on it to hold the paper in place. Make sure you also have another watercup, now for a varnish, as you need it later. Then, take a color palette, paint tubes and a cup full of brushes. It's good to have a whole own selection of brushes specifically for doll use. I also recommend getting a bamboo skewer or palette knife to mix paints, but if you don't have those, use a paintbrushes' handle end for that (that brush should be old or cheap, don't ruin your perfect ones by dipping their handles in paint). Never mix paint with the brush part! Especially, never drown it to the paint so deeply that the paint covers the entire hair and metal part and higher! Respect your tools... Especially acrylics can easily kill brushes. And as the varnish is yet more lethal for them, use only worn or cheap, not-so-lovely brushes for applying it.
 |
| A bad photo of a cup (cat food can) filled with brushes. |
 |
| A bamboo skewer as a paint mixing tool. |
Have some cotton gloves to hold the doll with your other hand while using the other for painting. Silk clay doesn't like sweat or skin oils and can't be cleaned with anything liquid, unlike plastic.
When mixing colors, put only small amount of it on the palette. It's rare to need a big blurt of it for a doll. If you use black or white, it's useful to put only small amount at once and add more if it ends. Be careful with other colors. To spare them from drying, put something plastic on them (for my palette I have it's package plastic to cover it - perfect!) or mix the paint in a small jar that has a lid.
 |
| How my painting arena looked like at once. (That brush cup is a thrift store treasure, I don't know who painted it - but that is why I bought it.) |
Now we can start painting. It's actually very relaxed part. I can't give you all kinds of tips since it depends so much from the doll, amount of paint and what you're going to paint on it. Though, if you're a first time painter, then I recommend testing the brushes and techniques on paper or a waste clay piece for first. Moisturize your brush in water before dipping it to the paint (a tip for beginners). Check what happens when you dip the brush to the paint and apply it, and then dip it to the paint and secondly to the water and apply. The latter is called "thinning the paint" and it's extremely useful. It spares paint and allows you to wash areas that the thick paint doesn't get into. I often use that for adding shadings and areas that require some blending. I also use this thinned paint to "lock" the areas I'm going to add color into, like white markings. So, it acts as a map. Because one layer is never enough, add more, they will first be thin and a bit transparent, but eventually you can add thicker layers on them. Remember to wash the brush frequently, although you aren't ending the painting session that time.
I can give one tip that I find useful: Put small amount of paint to a palette, and use a large paintbrush to drop some water on it. Make it very flowing. Then take a bamboo skewer or other thin stick and mix the paint and water. Then, take a small brush, dip it to this mix and draw a line on household paper. Now you have some thinned, transparent paint without the need of fighting against drying time while checking how transparent your pigment is! Just dip the tool to the color and apply. I used this to do Mimmi's ticking texture, and it really worked. I layered it a lot and it got done quite quickly, if I can say. (And I did that with a very small brush!)
 |
| Water-diluted paint with a tiny brush. |
 |
| Ticking on Mimmi's back. |
 |
| Asko and his "sidebalds". |
Use larger brushes for large areas and small, narrow-tipped ones for detailing. This is obvious for experienced painters, but a beginner will genuinely find it to be a new thing to know.
Be careful and do not hurry. It pays itself back at the end.
After you've painted your doll, take some matta varnish, like Vallejo or what you can find and what works. It has to be okay for acrylics, and also must be waterproof. Also take a cup of water (separate from the paint water cup) to wash your brush - you have to wash it more often than with paint. I recommend refilling the cup after every session. For the brush, get some older or cheap brush that has quite flat and not too small or large tip.

When you apply the varnish on the doll, use only small amounts at a time and make sure the layers are as thin as possible. Otherwise they shine (or look dull) and are visible afterwards. Some varnishes can be thinned with water, but I personally don't do that since I add a thinnnnn layer only. It's okay to cover some areas of the clay too, it's harmless, and I myself can often varnish a whole head of the doll if there's a largely painted area to seal. When done, leave it to dry for at least few hours, not bad if it's longer than six hours. Then add a second layer of varnish. Again leave to dry for a good time.
Second step is about...
EYES
After the paws and tails and optional painting, we need to add color to the doll's eyes. This is the best or worst part of the whole thing, because eyes add so much expression to the doll. They make it alive. Eeek! Again, use acrylics. Paintbrushes have to be small, even
incredibly small. Another important thing is a glossy varnish. I have Marabu's brilliant glue-varnish.
 |
| The one and only tiny detail brush with a palette and a mechanical pencil. (I really have few of those tiny brushes... I couldn't survive with only one.) |
You yet have your settings for painting? Good. Have a cup full of small-tip brushes. They're awesome, I say. They also are gold, I say too. Make sure your watercup is filled with clear enough water, though it's okay to have one cup for dark and one for light colors, as washing the brushes will dye the water quickly, and we need to use thinned color to blend things.
What colors to choose? What you like. You can also mix colors from the primary ones, so it's not necessary to have a huge amount of tints in stock.
The thinned paint on palette is very useful with eyes too, like adding shadings. Otherwise I just do with the thick paint and try to be fast and careful at the same time. It's also useful to have few dolls to paint eyes for at the same time, that way they can be let dry while the other gets a layer on.
Often I also mix colors "raw" straight on the eye, but that can be done on the palette too.
 |
| Eye paints before mixing... |
 |
| ...and after! I didn't mix them perfectly, because that happens automatically when applying paint on the eye. |
First do the base color. If your doll has visible eye whites, use white or red or pink and cover the eyes with that. Fully. The bead's own color shouldn't be seen anymore. Then, add a thin layer of the iris' darkest(?) color to where you need it, and let dry. Apply more of that, as long as you need. Add shadings in layers. Then when that's done and you're ready for a pupil, take a tiny brush, dip it to the water and paint and apply in few layers on where you want the pupil (make sure there's not too much water).
 |
| Valtti's eyes in base color. |
 |
| Pupils done! Cat eyes are easy... |
After the paint had dried, apply some glossy varnish. This doesn't need to be thinned at all, just add a thick layer of it to each eye! Even twice. Make sure there's no any air bubbles, though they often disappear when drying. Put gloss to the doll's nostrils and mouth too. Save your brush by washing it immediately.
If your doll isn't getting a mane or jewellery, it's now finished!
MANES
Manes are optional, and I don't recommend these for those who are trying to do their first doll. You have plenty of time to learn this later. But, if you want to see how I do manes, here it is...
I do manes from viscose hair. Viscose is made from some kind of plastic and therefore is animal-free. I attach it with quick-drying universal glue, currently Uhu.
I get ready with a rubber mat, glue tube, a applying tool, scissors and some package plastics.
 |
| It looks messy, because hairing is messy. |
 |
| A gluing tool. |
To start, I take a tuft of viscose and check if there's some "uncut"-looking tress somewhere. I try to find them as many as I need for a complete mane. If I do a mohawk, who often look trimmed, it's okay to grab whatever I see since it doesn't have to look like a tress. I cut the tress, hold it by the cut end and dip to glue. I use a tool to scratch it flat, and leave to dry. Repeat the same for another tress. I place the tresses on a package plastic. When they're dry, I cut the glued parts so that the hardened area is now smaller/shorter, and cut it vertically to smaller tufts.

To attach the hair, I blurt some glue to a waste piece/package plastic, dip the glue in that and quickly press into it's place. I always start hairing from the back of the skull, and so have the tufts in an order where I grab the most backside-placed one first. I hold the tuft in place for a moment, then take another and repeat this. I can also apply glue to the mane slot and press the tuft there... How I feel best at the moment. I'm not good in this anyway, so I do whatever I find useful and try to make it as clean as possible, but it's hard. Other people will surely have a better technique to that!
 |
| I start the hairing from back of the head. |
When the mane is done, I allow the glues to dry a moment. Then I carefully check if it's ready for trimming. If it's a mohawk or otherwise okay for scissors, I clip some off to make a shape for it, but the uncut-looking tresses shall remain how they are. I may take a cup ow water, a flat oil paint brush and apply a small amount of water to the mane. I whether brush it against the doll's face or hold them next to the mat's surface and "brush" the mane to moisten it. I try not to use too much water, since I don't want the mane to get wet, just shapeable. This is usually enough to tame it and make it look okay and less wild. Sometimes I also - after moistening the hair, when it's dry - may smudge the hair with a finger that's in a cotton glove.
 |
| Before moistening... |
 |
| ...and after! Much more photogenic, too. |
THEN... WHAT?
Name it. Make it a personality. Write infos for it. Let the doll tell you it's life story! In no time you are in trouble because you have to make it a family, friends, get a stable, and so on. It never ends.
-----------------------------------------
Okay, it ended up being not so simple tutorial. As I said in the beginning, I can't do simple things.
If you liked this tutorial or felt that it's helpful, let me know? Also if there are spelling errors, tell about them too, as well as if something seems hard to understand. Some things are hard to explain properly in English, when it's not your language.