25/02/2019

First finished customs of the year

I finished these two already in January, and I think I'm not going to finish anyone in this month currently ending. So I tell you about two Schleich works that I wasn't expecting to finish this quickly.


Both were bought, knife-trimmed, resculpted and finished in January, quite a bit before my birthday.

The clay I used was Fimo Air Basic, and it's... good, but not ideal for customizing; it gets shaped nicely and is as strong/weak as this kind of clays always are (not to compare with epoxy at all), but when doing large areas it's not very friendly. Just look at those horses I am going to tell about, their clay edges are too visible. I don't own anything to sand them down, and that even isn't an option when you have sculpted hair texture. I'm not good at using modeling paste, and it didn't help with that despite trying hard. Maybe I do something wrong. Or, definitely, I DO something wrong here. I already decided that I have to fix that finnhorse's barrel, but I really don't know how... I'm not going to add clay there since it could ruin his paintjob. It needs to be something that doesn't mess.


The first one was a TWH gelding who was just another one of that mold to become a finnhorse. I haven't finished any of the previous ones, so I was happy to see how this one did so. I kept it simple and didn't modify his position, just whittled his nose and ears off. That maybe was the reason why he finished so quickly, as there wasn't much need for extra pauses to wait clays to dry.

In the left is one TWH-going-finnhorse with terracotta Krea clay.

And what comes to the clay, I just surrounded this horse with it... I added so much as I wanted and needed to make him both to look like a finnhorse and also to make him look a bit bulky, older and food-loving gelding. That is a traditional horse for me; that one you can go to roam in a forest with.

I also tried hard to make the forelock hair to lay nicely and not as stupidly as I am prone to do that. With manes overall I tried to test a new technique: I smudged it to the surface like if I resculpted a body part, and added the hair texture only after that. The main reason to fade the hair ends is to make it easier to paint later.

What comes to his paintjob, I had good time trying to decide which color he should be. Finnhorse is a very colorful breed despite being usually chestnut; it's just common, but not the only option possible. I still decided to do a chestnut, since I love that type of color and it's variations. Recently I've been liking delicious types of dark/liver chestnut, so decided to paint this as one - the decision got fed by a fact that I've made few dark chestnuts already ages ago around 2010, so it finally was a time to see how I could to do that as I'm an adult and more experienced with painting!

Middle and pangare tints added to the body. I use dry brush technique to shade limbs.


A brown horse is not just a plain brown, but it has tints. I love that fact, though I'm prone to overdoing shading so I have hard time knowing where my horse is going when finished. Also, as I use acrylic paints only, it's tricky to fade the color changes nicely. With this finnhorse I developed a new technique that I can finally call a working one: I use a small brush and very little color at once, and smudge the colors quickly without cleaning the brush between that. I only occasionally dive it to the water bowl to avoid the common disease called "don't let the paint dry to your brush". And no, I don't thin the paint at all. I trust in the small amounts and the fact that a thick paint, when used carefully, will work well when you really paint it as flat as possible.


Here's a example of his face progress:

Base color, no details.

Lighter paint, pangare, added. Later he got yet darker layer of brown dry brushed to his face.

And here he is finished, with the OF TWH.


I decided to name this finnhorse as Koppis, referring to his failed barrel sculpt (that what needs to be fixed). Koppis, koppakuoriainen, means a beetle, and we know that their front wings (the harder  surface is a modified pair of wings!) don't smoothly blend to the body. Just like this poor horse's barrel clay. The name also matches his color, which is important.


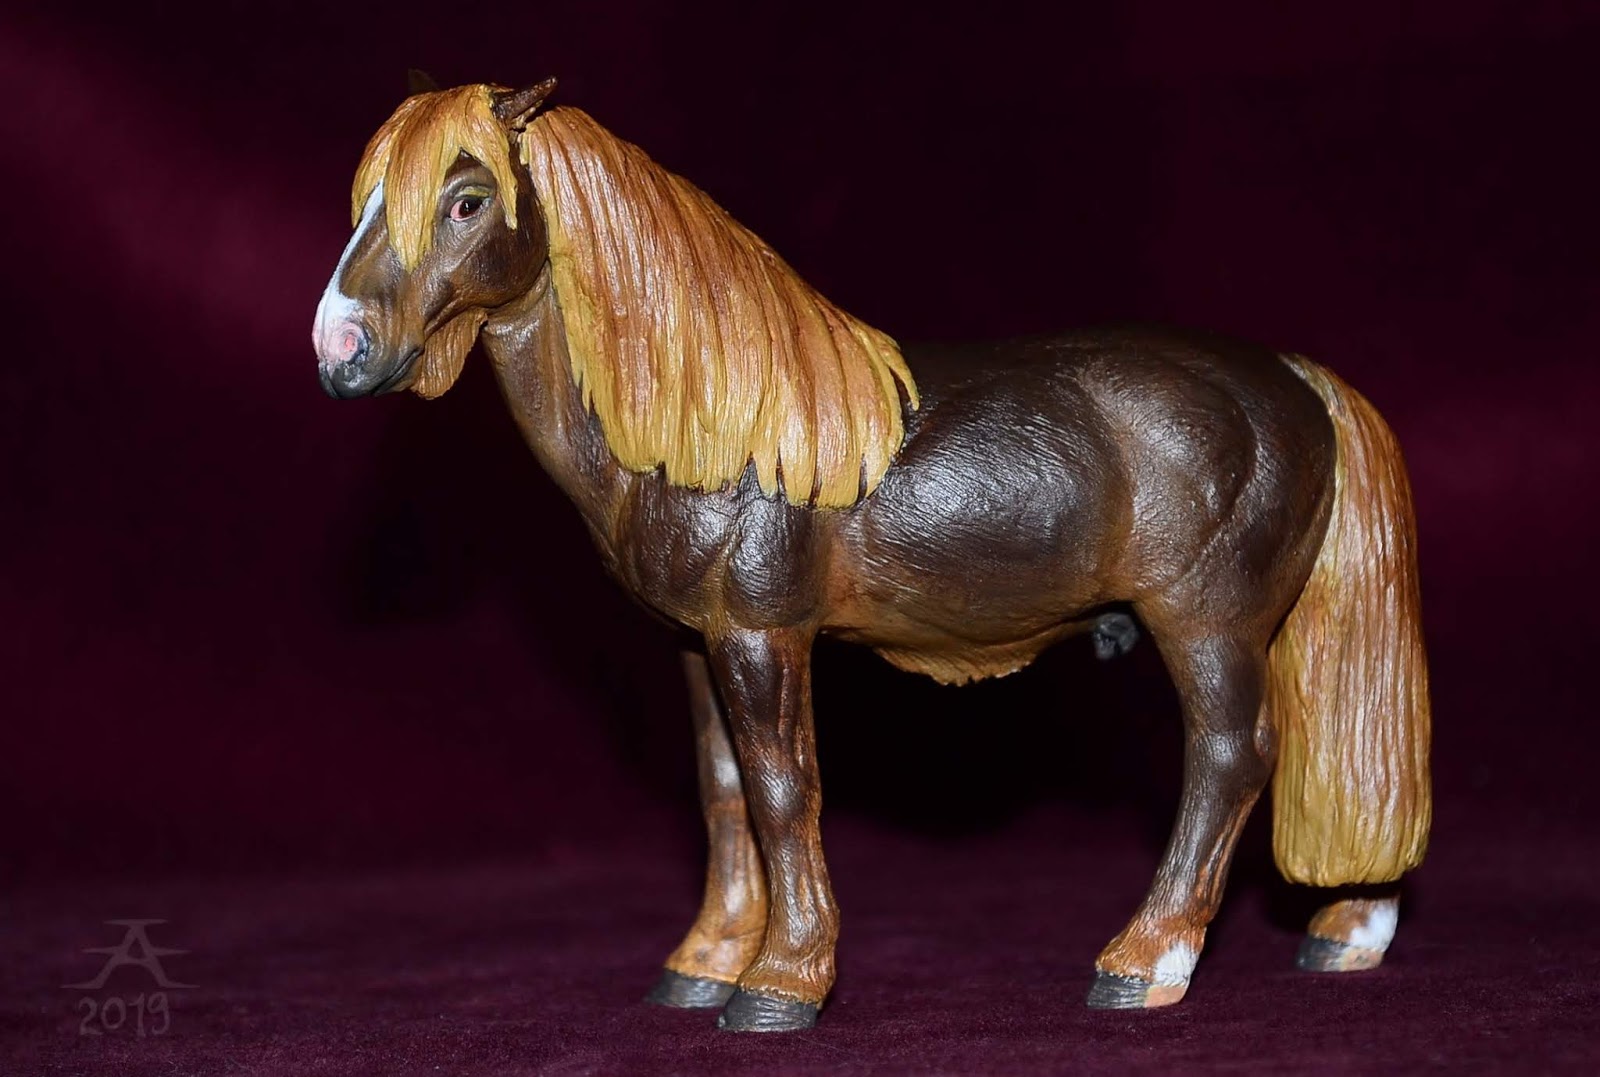
Face details... It's luck that his face sculpt doesn't show any serious issues, so it's fine. The problem area is only in his barrel. Because - that face is something I've tried to do for long time, and I wish Koppis has the 'finnhorse expression' that you don't see in other breeds. In my view it says "sorry that I do exist, but I do my best anyway".


Onto the friesian then. For a long time I've planned to do a custom on the standing friesian stallion mold, and this time I actually made that happen. I tried to correct all the clearest errors of the mold, so I needed to change it's barrel shape, neck, face, expression... I resculpted the whole mane and tail just to see how I success with trying to do wavy hair texture for the first time ever.


When the painting time got closer, I struggled to decide what kind of black I am doing from this horse: a sunfaded black (meaning it's actually brown), just a black (too simple) or... blueish black? I sticked with the last idea, and realised that this was my time to do something I've wanted to paint for a looooong time. And I don't see blue horses very often in this hobby, since everyone prefers super realistic coloring.

To do it as well as I can, I added a bright blue basecoat... And was late to capture it with the camera, since I hurried to finish the horse; I better finish than wait just for photos to happen. The blue paint gave him some extra grainy texture since it wasn't really liquid (so I tell, NEVER buy paints that are not liquid in the shop... I bought this and few other bad paints ages ago since I know the brand is good, but these bottles seemingly contained stuff that wasn't okay). I needed to wet the 'paint' a lot with water to really be able to paint it like you do with a liquid color... Well, that wasn't so bad, since it forced me to add thin layers...

The contrast isn't that harsh really, I just like to exaggerate everything with my camera... Or then I don't know how to photograph at all. Also that paint isn't that shiny, aagh. 


Black paint - this time it was semi matte satin acrylic by Mont Marte - is awesome. You don't need more than one or two layers of it, really, and still it allows the undercoat to show through. That was what I wanted. Another thing is, that when the black is the main color, it's just easy to fix errors like when a mane color doesn't stay where it should. It gets fixed just by adding some black paint there, and no need to worry about ruining the body shadings.

My friesian got blue mane and tail, and also feathers. I also added some blue to give him subtle pangare, which got carefully overpainted with black again. All his colors are black and blue except the eye white, which is actually red, as well as that red spot in both of his nostrils. Even his hooves are blue, though looking very grey - that was the last time I use that bottle I bought 10 years ago... It was already a bit dry for use.

Here he is with the OF stallion.


Face comparison. I know his nose is huge, but I could just... call it a style. At least a piece of some drawing style I developed ages ago and almost grew out of after focusing to very realistic horses. (Which brings to my mind that I should scan a lot of drawings that are my visualizations of what to sculpt or paint... All about miniatures. This friesian was one I planned on paper, and that is the last time I do that for my model horses.)


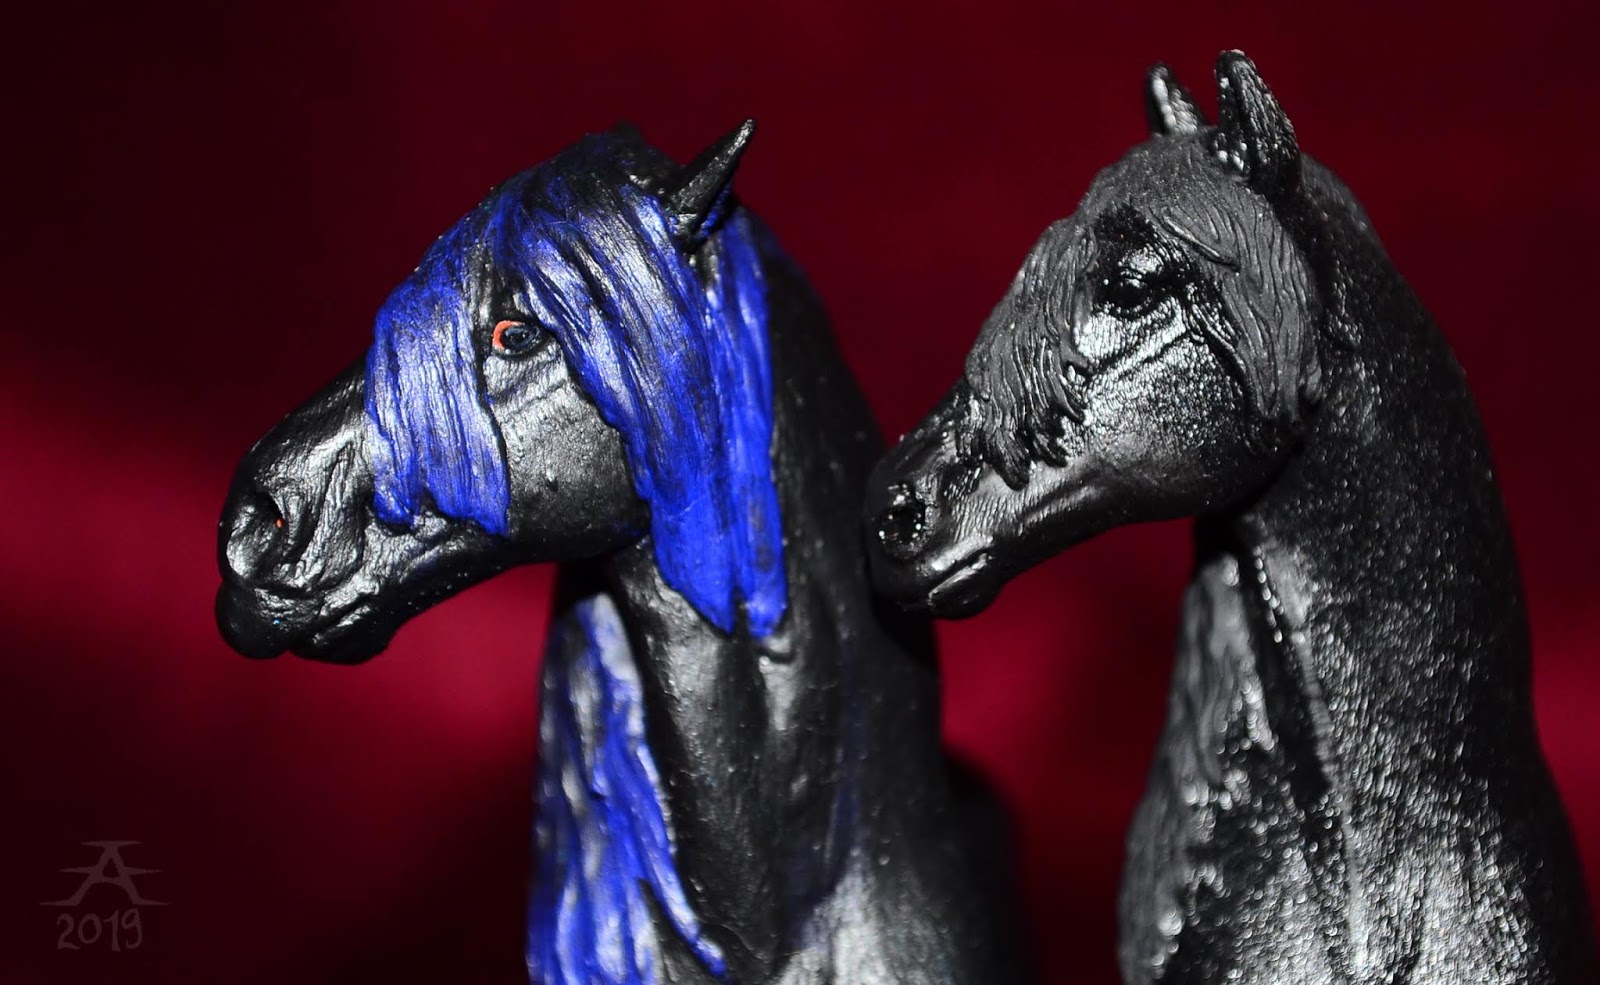
My blue friesian got called as Earl. I wanted it to tell something of the time he was finished, and it was just an accident that the word 'early' needed to drop one letter to become a matching name. He definitely looks slightly vampiric, I say...I also got an idrea that I need to redo him in traditional scale someday, as he just got too much character to stay as a Schleich only. And I think he would need mane and tail (and feathers?) made from mohair or viscose (or yarn) since that much clay hair would just limit the use of tack. Maybe I learn to sculpt someday.


I have difficulties to decide which of the photos I leave off from the blog... I seemingly made a horse who I like to photograph. It's mostly a good thing - but Earl looks shiny in these, which he really is not, and the light behaves badly.


I lost my self-control when moved to take headshots, and... Just played with lights, flash, mirrors and the horse's expression. I didn't get what I exactly wanted, but these will be just OK for now.


It seems that every model horse has their better and not so better side, and with Earl the better side is his right. One factor may be that I don't have a flash that is separate from the camera, so it has a role how I hold the cam.But really, his face is sculpted worse in the left side.


This light was caused by placing the horse very next to a large mirror, which reflected the flashlight strongly.


I want to post some new tack later. It's in traditional scale.

16/02/2019

Factory weirdnesses

I'm so very good to say this, as my collection isn't huge, but I already know I have one model that is different from what all his clones are. My Cortes lacks eye whites!


How common are this kind of flaws in Breyers, overall? Is it nice or irritating to find out if your model seemingly is one of these? (I know some collectors don't accept even small flaws in their horses. This alone will do a difference in each collection.)

I personally like my C a lot. Partly because he was one of the two first Breyer trads I actually bought from internet; the first EVER was my PAM who was a flea market treasure.

I've noticed that sometimes Breyer should have some variety in the expressions of their horses, as the "looking forward" is not an option all the time, really. Often horses try to look more to the side or backward than forward.

For me, flawed models are really unique, as long as it's not about something like a paint drop escaped to wrong area - like with my Babyflo who has sand brown drop on her forelock. It definitely doesn't belong in there, so it's a factory mistake.

Anyway, I seem to be the rescuer of all failed models generally, according to how well the failed models end up with me. It's not a bad thing as long as the issue isn't too big or clear or disturbing.

I also have a random hobby of purposely finding and buying flawed models, as long as they fit my taste. Bent legs are not nice, I hate that as a thing, but interesting errors like paint flaws and mistakes are nice to find. I've done that with Schleich now, and I own a couple falabellas and a eyeless pony mare.

The falabellas I bought at 2017 as I was buying victims for a customizing tutorial I was doing with beginners in mind. I found what I needed, but my eye stuck to a difference among the row: one falabella was painted differently than the others, while being meant to be the same color! I have no idea how soon I could see the same thing again, so I had to buy both normal and the weird one and one normal for customizing.

The 'average' falabella pony. Creamy-ish color, no much contrast between the coat and mane & tail.


The strange one. He's much more yellow compared to the average guy. Hooves are very dark as well.


As you compare these two, you may notice how different not only the colors are, but also the spots. Especially the backside spots look like they're not meant to belong to one and same pony (good).


Their difference is this clear both through photos as seen with eyes.

I could definitely like to get information of why this kind of paint differences do happen in a batch that is sold at same time. At least I can try recognizing different painters by that, but it still feels weird.

The pony mares I bought at January 2019. As always, I was again looking for potential art victims, and saw that actually that pony mold wasn't so badly sculpted as most of Schleichs are. I was fine with having one OF in my shelf next to future CMs. As I checked which of the ponies was most flawless, I noticed that one of them had no eyes painted! It was a zombie! I bought it and one okay conditioned normal pony, but nothing for customizing, since I already had choosed one horse for that and Schleichs are too expensive to buy a lot at once.

The zombie pony.


While factory errors can be interesting, they also are gold for a artist who is interested to find out how some products are made. It's clear that Schleich loves airbrushing as a technique, just to use a brush after it. Though this isn't a difficult one to guess by those ponies. I rather continue to wonder why and how that kind of flawed model sneaked through the process and ended up in the store, and after it in my collection. Where was this mare made? How did it end up in Finland, let alone in my town? How was I in that store buying her at the right time? Schleichs are quite mass-produced stuff so this is a interesting coincidence. The shelf wasn't even overpopulated of the horses.

I don't see this kind of things very often. Maybe that is thanks to strict quality control, which focuses on keeping the models safe for little kids, I guess. Paint flaws definitely are not a safety risk, so they sometimes end up in the shops. 

03/02/2019

Rough plans for the year 2019

I'm not those people who plan a lot and succeed in it, but I WANT to do things, so I do rough plans. Something that I can do in theory.

Namu in a violet flowemore bridle (not made for that mold...).

Finish at least one horse per each month. This should not be hard, if I stay away from cutting Schleichs in ten pieces and having no idea how to assemble them to a new position. I should so simplier but still drastic-ish like (not really drastic) resculpting. I've already done this goal's first step, January, as I started and finished two horses. More to come!

Make some tack at least once each month. A bit easier goal compared to that customizing one... And it shouldn't matter what the tack is, most important is to get it done. Be it halter, rope, a complicated bridle or a new design of a saddle. Very easy goal since I very easily build about 10 pairs of curb bits at once, since I can't get enough of designing them. Now with some stupid plastic beads with colors, because that gives variety to the bits and I haven't done that previously.

Behind the scenes. An exploded tackmaking table.

Finish at least one doll per each month. Easier said than done, but possible. January failed, although I played with the idea to do a doll at/for my birthday, but I did horses and bits and bought art stuff. Well. This can happen, in theory.

Finish at least one photo marathon per each month. Yes, all my goals are month-related. This just is realistic enough to think. I usually photograph at least once a week, and build a big bunch of pics by doing that, and at the end I empty the camera to my computer after I have enough pics. The time to spend to this doesn't need to be long and it shouldn't require having at least 500 photos to check and edit and throw away.

Lanttu the red gelding as a dressage pony.

Then... Try to publish a finished blog article at least once a month! See, at least! I've been very bad blogger for years, despite how addicted I am with blogging. I simply have difficulty to finish the texts and throw them public, because of self criticism and negative feelings what comes to my creations and writings.

Improve with photo stacks and photo stories. For too long I've seen that something's not right with my photo stacks, but I can't fix it. Let's see if this is possible. I bet it is not. List of things I need: backdrop landscape pictures (to be painted), a lot bigger studio box, at least one or two detachable lamps that I can use to leave the flash off... Doll clothes. Realistic saddles that could actually look and behave like saddles do. Oh damn, this will never be possible. What am I planning? Extra plan: PUBLISH THE PHOTO STACKS AND STORIES. (That will happen in Visualrat, if happens.)

Do more (or any at least) photo stories. It can't be that hard. (Or then it can.) Basically, I just mean that I could do model horse photography to build stories.

Twins, Offhand and Grievous, checking a new horse. From a photo story.

I'm afraid of planning anything more, because I'm very good at failing with this kind of things. I also don't want stress to my life, so I try not to add too much pressure... Wait, I need difficult projects? Yes, but I want to like doing them, too. 

02/01/2019

I made a double bridle...

For longer time I've avoided making double bridles for 'mouthless' horses, because double bits are a question to make. I want everything to really look AND work like the full scale thing, so it took me few years to finally try.


Because double bridle means also double bit; having two separate bits in the horse's mouth at same time, I was in trouble with my modeller life. Nothing serious actually - I simply had no idea how to combine two bits to the technique I already have invented to make bits literally working on mouthless horses. One mouthpiece fits there just well enough, but another one isn't an option! So how to fix that? I got few ideas to try, failed and had to invent more.

The final product is... Well, a curb-snaffle -combination assembled from FOUR moving metal pieces that are attached to each other. It goes this way: mouthpiece-curb-link-snafflering. Jeep. That is it. Though it's yet a trouble. The link disturbs everything, but at the same time, the snaffle could drop away without it... And the main problem with that stupid link is that it seemingly is disagreeing with a curb strap when I add one to the curb. Grrrr.

Bad photo of the bit combo, but I don't have anything else right now.

(Edit; february 2019. A photo of the double bit who is the star of this article:)


Otherwise, it seems to work nicely enough. Big part of this is how the bridle is made. Strong but soft enough leather with tongue buckles is a perfect thing, but may be difficult to keep good looking as the straps and buckles require more space than it really should. To make thinner strapped bridle, I have to use very narrow and almost paper thin thinned leather lace... With sliding buckles. Yay! NO. After accustoming to how nice tongue buckles are, I've realised how horrific slideys actually are. I can say I hate them most of my time. They also look boring, so... The only big plus is that you can have a buckle and the keeper in the same, but that's just... all of the good.

This is the same leather what I used for the star of this article.

Older bridle from that leather.

But anyway. I made a double bridle from that super thin(ned) leather. It has all parts we need for English doublie: browband, throatlatch, three crownpieces, five cheekpieces (one for noseband), noseband with a flash noseband attachment, a flash noseband, and... The bits and a curb strap. Most of my time with that bridle I've just fought with piling the crownpieces nicely on each other behind the horse's ears (very yummy to do with fragile paper-like leather...), and adjusting the cheekpieces so the bits could work nicely and no air could be found between them and the horse. SO MUCH EASIER TO SAY THAN DO... People. Rly. Don't do paper thin leather and sliding buckles. It's very irritating.

Sometimes I find my worktable a good photography place. Weird, but yes.


The dressage bridle's cheekpieces have some metal parts recycled from four similar cheekpieces I had to destroy after realising how bad buckles were in them. That leather can't be saved after it's glued, so I just got the metal pieces and threw leathers away. It was really nice to have some parts already made...

...but I still had to make sure I have enough buckles for second projects. The buckles are shaped like the number 8 and are really small, in fact they're perfect for that stupid leather I used. At the same time I made some mini jumprings and some other pieces. Because, as you see, a double bridle gets a lot of those (and the jumprings get re-shaped to ovals!)...


I must mention how much I like the "used" look in the straps after they've wrinkled by rough handling... Which is needed, unfortunately.


I seemingly made seven curbstraps from that stupid leather after finishing the bridle. It was pain still.

As you possibly got already sure of, I lost nerves with that bridle. Every time I use that leather I just think why the hell I even try. Yet less nice as I realised I had to redo about half of that whole damn stack of straps (after snapping some straps because they were too thick to go through the buckles... and because the throatlatch was too short). It's not worth all that pain. Or is it?

Actually, I had to get a pause from that bridle project as I didn't know how to survive with it anymore. At some point I then had two bridles to work on... I have no idea how. The first was that  stupid dressage trash bridle and the other was just... random. So random, that I ended up making an another, average bridle from it. The reason to change straps was that they were often too short for the Salinero mold, as he's not the smallest horse in my shelf. Also this other bridle had to use a browband that I tried to pad with red suede lace, which didn't work, so it looks unclean now. Not sure if I retouch it later.

That average bridle in use... Seems to be the best way to take good photos of my tack.


The good part is, that too short straps can still fit smaller heads, so I have different bridles for different horses. Even although I have made my tack recipes mainly for warmblood size. This bridle can work as a 'lesson bridle', meaning that it's simple enough for riding school students to use - my modelverse's main stable has an ideology not to put beginners to use double reins. And with good horses you really should not need anything else than simpliness.


With these I again thought how nice it could be to have a normal instant-splattable glue to use. Contact glue is a bit difficult and irritating to do just for small bits that should be done in a second. It also makes impossible to add paddings properly, what comes to nosebands and browbands. Padding adds so much nice detail that I really wish to do that more to my bridles.

So I guess it took a couple of days to finish that double bridle. I still hate the leather, but at least I now have the bridle... And double bits.

I hate being compliment for myself, but I have to say, this is quite something I never believed I could make. Yes, it's just a bridle... But model horse tackmakers know how easy it is (not) to do a mini bridle that looks and works as realistically as possible, when compared to the 1:1 scale thing. This simply is something I wasn't thinking to do when I first started tackmaking in 2013, ever. Maybe it's the straps' narrowness and the detailing that makes me say that this is quite OK bridle for my personal view now (even without tongue buckles). Still has a lot to improve yet, of course. Like, putting this on any model is a painful experience... Who knows if the second similar project just misbehaves too much to get done at all? (I really felt stupid when writing this part of the article. Really. So much I hate being kind to myself. And that is not a joke. OK: to be honest I just didn't list all the errors this irritatingly fragile bridle has...)

And as my quite new saying goes, everything looks good with a halter bridle on.

Flash noseband attachment... And no, this bridle doesn't look that dirty out of photos.

I wonder if the throatlatch is yet a bit too short...


What's very weird is that I really need these irritating projects. It keeps my brain busy. It's good for health. A simple bridle (browband, cheekpieces and a throatlatch) with three tongue buckles seems to be already too simple for me.


...must make more double bridles. Though not from that idiotic leather. Pffff.

Or maybe yes.